Reverse engineering PoE on the TL-SG2008P V3 firmware - Part 1
Background
I recently bought a cheap TP-Link switch in hopes that it would be able to run OpenWRT. Unfortunately, it seems like I bought the V3 variant of the board, whereas the existing OpenWRT port only supports the V1 variant.
However, from poking around the firmware and looking at the board, the only difference appeared to be the PoE controller chip. The V1 has the TPS23861 chip, whereas the V3 has an MP3924. A reasonably fully-featured OpenWRT port to the V3 variant doesn’t appear terribly difficult if we can somehow support the different PoE controller. Unfortunately, at the time of writing, the MP3924 has no Linux driver support.
In order to write a driver that would operate safely, I wanted to first find out how the stock firmware configures the PoE controller (more specifically, how it configures the power limits).
In particular, the stock Web UI allows setting custom power limits on individual ports in watts, but the datasheet for the MP3924 seems to suggest that the over-current protection limits must be configured in milliamps. I’m guessing that the firmware assumes a input voltage, and uses that to work backwards from a power figure to a current figure. However, I wanted to make sure, since this could end up being a safety-related issue if the driver does not correctly configure the over-current protections for this particular hardware.
The plan
- Get a root shell into the stock firmware to faciliate experimentation.
- Make a change in the Web UI regarding power limits.
- Somehow read back the hardware registers to see what changed.
- Go to step 2.
In this particular post, I will be focusing on step 1.
Hardware modifications
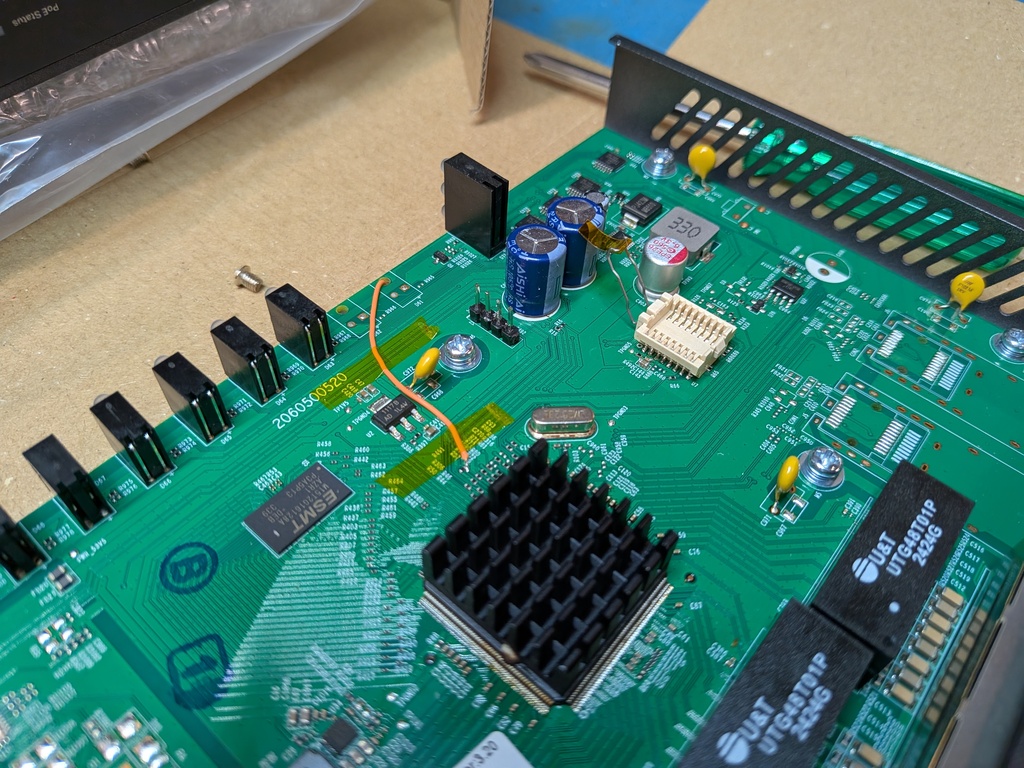
I don’t know of any software vulnerabilities in the current firmware version that would allow us to get root via purely software means so my plan was to obtain root by modifying the firmware image using a hardware flasher. To faciliate this, I desoldered the flash chip, and soldered a socket that would allow me to easily move the flash chip to/from a hardware flasher.
Furthermore, when working on embedded platforms, it’s always useful to have a serial port for debugging, so I also soldered on pin headers. Unfortunately, the serial port header also requires adding solder bridges (or 0 ohm resistors) to some pads, and I wasn’t able to get a solder bridge to form reliably. I ended up soldering a bodge wire instead.
The stock firmware boot process
The onboard flash has roughly the following partitions:
- Bootloader
- Kernel
- The kernel has a built-in initramfs, which appears to be a standard buildroot root filesystem.
- Houses TP-Link’s custom init script.
- Two squashfs images
- These images contain all of TP-Link’s proprietary binaries.
- There are two since the switch supports “dual booting”, presumably to allow recovery from a bad firmware update.
- I didn’t look too closely, but there’s likely some boot variable that the start-up script reads in order to pick the right image.
- A JFFS2 filesystem
- This looks like where user settings are persisted.
At a high-level, the stock firmware boot process does the following:
- Mount one of the two squashfs images, depending on which is the “active” one.
- Mount the JFFS2 filesystem, containing the persisted user settings.
- Run the proprietary TP-Link startup binary located in the squashfs image.
The full startup script can be found in TP-Link’s GPL source code release for the firmware.
Hijacking the boot process to run an SSH daemon
To me, the most straightforward approach to getting a root shell was to modify the squashfs image to include a statically compiled SSH server that we can use to log in as root. Dropbear is a commonly used and favoured SSH server for embedded devices due to its size and simplicity, so that’s what I used.
To hook into the startup process, I replaced the normal TP-Link startup binary with a wrapper script that starts dropbear, then execs the real startup binary:
#!/bin/sh

mkdir -p /tplink/usrapp/dropbear
ln -sf /tplink/usrapp/dropbear /etc/dropbear
ln -sf /tplink/image/dropbear/dropbearmulti /sbin/dropbear
ln -sf /tplink/image/dropbear/dropbearmulti /bin/scp
ln -sf /tplink/image/dropbear/dropbearmulti /bin/dropbearkey
ln -sf /tplink/image/dropbear/dropbearmulti /bin/dropbearconvert
ln -sf /tplink/image/dropbear/dropbearmulti /bin/dbclient
cp /tplink/image/dropbear/shadow /etc/shadow

/sbin/dropbear -E -p 1234 -R

exec /tplink/image/usrImage/app/sbin/core.real
In high-level terms, the script does the following:
- Creates a folder on the JFFS2 persistent storage for storing dropbear config (if it doesn’t already exist).
- We use persistent storage here to avoid having to generate a new host key on every boot.
- Creates symlinks under
/sbinand/binto thedropbearmultibinary. - Overwrites
/etc/shadowwith a copy where root has a known password. - Runs the
dropbeardaemon on an unused port. - Execs the real startup binary.
(Note that the squashfs image is mounted under /tplink/image, and the persistent JFFS2 filesystem is mounted under /tplink/usrapp).
Building dropbear
Cross-compiling dropbear was relatively straightforward using the precompiled toolchain found in TP-Link’s GPL source code release. Note that you may need to install 32-bit libraries if running on a x86_64 system. On Debian, this is just sudo apt install ia32-libs.
export PATH="${PATH?}:/path/to/gpl/source/omada_switch/20161108_WebUI_upgrade/tplink/buildroot-realtek/ext-tools/msdk-4.3.6-mips-EB-2.6.32-0.9.33/host/usr/bin/"
./configure --host=mips-linux --enable-static --disable-zlib
make PROGRAMS="dropbear dbclient dropbearkey dropbearconvert scp" MULTI=1 -j8
Generating a new /etc/shadow
For this, I just copied the existing /etc/shadow and generated a password hash for root. This password hash can be generated using openssl passwd -1 <your password>.
root:$1$tie/0Ymw$9ucfZx.CpHktEDumfb13D1:10933:0:99999:7:::
bin:*:10933:0:99999:7:::
daemon:*:10933:0:99999:7:::
adm:*:10933:0:99999:7:::
lp:*:10933:0:99999:7:::
sync:*:10933:0:99999:7:::
shutdown:*:10933:0:99999:7:::
halt:*:10933:0:99999:7:::
uucp:*:10933:0:99999:7:::
operator:*:10933:0:99999:7:::
ftp:*:10933:0:99999:7:::
nobody:*:10933:0:99999:7:::
default::10933:0:99999:7:::
Notes on patching the squashfs image
I performed all image manipulation (unpacking, modifying, re-packing) all in a single fakeroot session in order to preserve ownership and permissions. Real root is not required.
The image can be unpacked with unsquashfs /path/to/image.bin. This extracts the image to a folder called squashfs-root. Check that the exit code is zero to ensure that all permissions and ownership bits were preserved in the extraction process (it will have an exit code of 2 if it failed to do so).
Once the filesystem tree is patched, the image can be re-packed with mksquashfs squashfs-root/ squashfs.bin -comp lzma.
Once the squashfs image has been re-packed, it can be spliced into a flash dump for writing back into the onboard storage. I didn’t look too hard into how the startup script chooses which image to mount, so I just replaced both:
dd if=squashfs.bin of=flash-modded.bin seek=1792 bs=4096 conv=notrunc
dd if=squashfs.bin of=flash-modded.bin seek=4352 bs=4096 conv=notrunc
Getting root
Once the switch finished booting, I was able to get root access through SSH 🎉:
 % ssh root@192.168.0.1 -p 1234
The authenticity of host '[192.168.0.1]:1234 ([192.168.0.1]:1234)' can't be established.
ED25519 key fingerprint is SHA256:kBKqsC8m0s0OPQlkNiNtLJ4fCAQSchJeTRqcb0smwu8.
This key is not known by any other names.
Are you sure you want to continue connecting (yes/no/[fingerprint])? yes
Warning: Permanently added '[192.168.0.1]:1234' (ED25519) to the list of known hosts.
root@192.168.0.1's password:


        Welcome to Layer 2 Managed Switch


  Press <Enter> to continue...
~ # busybox id
uid=0(root) gid=0(root) groups=0(root),10(wheel)
~ # uname -a
Linux streamOs 2.6.32.58 #2 Fri Aug 18 20:12:27 CST 2023 mips GNU/Linux
/ # exit
Connection to 192.168.0.1 closed.
I was also able to scp a test file 🎉:
 % scp -O -P 1234 test root@192.168.0.1:/
root@192.168.0.1's password:
test                                          100%    0     0.0KB/s   00:00
Having root access and being able to scp arbitrary files to the switch should make it much easier to poke around on the stock firmware. I plan to document the actual reverse engineering of the PoE controller in the next post.